How to Setup a VPN Connection on Your iPhone or iPad

With more than 700 million iPhones and an additional 360 million iPads in use across the globe, it’s safe to say that Apple’s communication technology will be around for a long time.
Because of their small size and flexible functionality, iPhone and iPads are frequently used by people on the go, tapping into public WiFi networks while at airports, restaurants, coffee shops, libraries, shopping malls, and academic institutions. Those connections are not secure and using your iPhone or iPad increases the risk of your personal information being stolen by cybercriminals.
Considering the amount of information stored on iPhones and iPads and the frequency of which they are used, employing a Virtual Private Network (VPN) is a brilliant way to ensure the safety of your personal information as well as the privacy of your time spent on the Internet, be it browsing websites, interacting with other people, streaming audio or video, downloading torrent files or transmitting sensitive data.
Setting up a VPN connection for your iPhone or iPad might seem like a daunting process, particularly if you consider yourself less than “tech-savvy”. However, by learning a few basic terms and following a few simple steps detailed below, you can ensure that your iPhone or iPad has an important extra layer of security when connected to the Internet via a public network.
Download the best VPN for iPhone and iPad!
How Does a VPN Work on iOS?
In a nutshell, VPNs create an encrypted tunnel between your computer and the internet that makes your data and personal information invisible to anyone trying to view it from outside the connection.
Instead of transmitting data straight to the Internet, it is sent via an encrypted protocol to the VPN’s server, often located in another country. From there, it is sent on to the Internet using the VPN’s IP address. Information requested from the Internet takes a similar route. It first travels to the VPN server where it is encrypted, sent to your computer and then decrypted for your use.
Quick Guide: How to Install a VPN on iPhone and iPad
The easiest way to set up a VPN connection is to download one of the best VPN services for iOS devices. All you have to do is download the VPN all and everything will be automatically pre-configured for you — there’s no need to waste time manually configuring any settings.
- Download a VPN. I recommend ExpressVPN as its the best VPN for 2021 and it has an easy-to-use app for iPhone and iPad. Try ExpressVPN risk-free with its 30-day money-back guarantee.
- Open the VPN. You’ll receive a prompt asking your permission to add a VPN configuration to your device. Tap “Allow” and the VPN will automatically configure your iPhone or iPad.
- Connect to a server. That’s it! You’ve successfully set up a VPN connection.
Step-by-Step Guide: Manually Configure a VPN for iPhone and iPad
If you’d rather configure your VPN connection personally rather than allowing an app to install it automatically, you’ll need to follow a few extra steps later in the process, but you also have a bit more control over how you’re connecting to the Internet.
To manually configure the VPN connection on your iPhone/iPad:
- Tap “Settings” on your Home screen.
- Tap “General”.
- Tap “VPN”.
- Below any pre-existing VPN options, tap “Add VPN Configuration”.
- Tap ‘Type”, the first selection on the new screen.
- There are three types of VPNs to choose from. If you don’t know which corresponds with the VPN you seek to install, check the VPN’s website. The three types are: IKEv2 (protocol developed by Cisco and Microsoft), IPSec (an encryption suite that delivers strong security and privacy), and L2TP (common mainstream VPN that has 256-bit encryption but is slower than some other VPNs).
- After highlighting your selection, tap “Add VPN Configuration” to lock it in and return to the previous screen.
- Enter the VPN settings information, including description, remote ID, and server into the appropriate fields.
- Enter your username and password into the appropriate fields.
- Tap “Done”.
- On the VPN Configurations screen, toggle the Status switch to “Connected: next to the VPN you just configured.
OpenVPN Setup Guide for iPhone and iPad
OpenVPN is known as the most reliable protocol for VPN connections because it uses 256-bit OpenSSL encryption to increase security. The best VPNs for iOS devices have OpenVPN pre-installed in its app, so you don’t need to set anything up by yourself. You just have to go into your VPN’s settings and change your protocol to OpenVPN. I’ve created some simple guides for PIA and PrivateVPN to show you exactly how to do that.
How to Install OpenVPN on iOS with Private Internet Access
After a recent update, PIA has OpenVPN available as one of its standard iOS protocols. When you download the app to your iPhone or iPad, the default protocol will be set to IPSec (IKEv2). You can change it in 3 simple steps.
- From the home screen, open the Options menu and choose “Settings”.
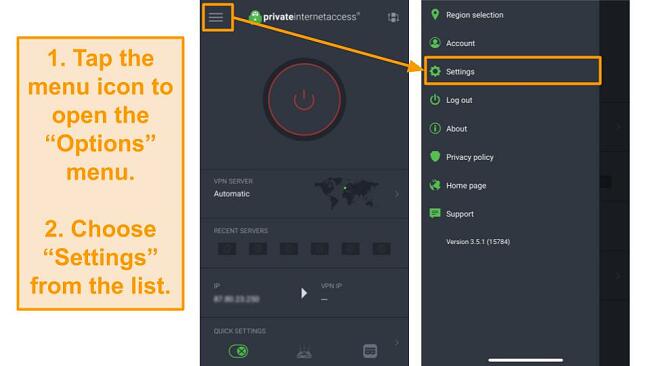
- Under “VPN Settings”, click “Protocol”.
- Select “OpenVPN”.

Use OpenVPN with Private Internet Access!
How to Install OpenVPN on iOS With PrivateVPN
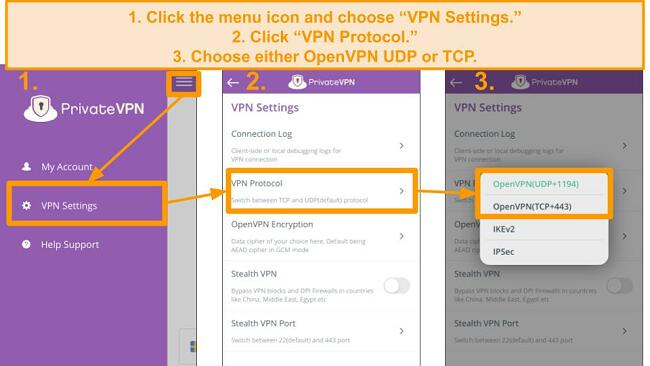
PrivateVPN has both UDP and TCP OpenVPN protocols available. You’ll be automatically connected to OpenVPN UDP so you don’t have to do anything when you sign in to the app. If you want to change to TCP, you can do so in 4 easy steps.
- Click the menu icon on the PrivateVPN app homepage.
- Click “VPN Settings” on the menu.
- Choose the “VPN Protocol” option.
- Change from UDP to TCP with a single click.
Download PrivateVPN on your iPhone or iPad!
Your VPN Doesn’t Have OpenVPN — Now What?
When your VPN’s native app doesn’t support OpenVPN for iOS, you have to use a client program like the OpenVPN Connect App. For example, IPVanish is a top VPN for iPhone and iPad but OpenVPN isn’t built into its iOS VPN app. You’ll need to download the OpenVPN Connect App and manually configure the connection. But don’t worry — while it sounds complicated, it really isn’t. Just follow my step-by-step guide and you’ll have a secure VPN connection in minutes.
How to Install OpenVPN on iOS With IPVanish
IPVanish doesn’t have the OpenVPN protocol in the iOS app. To get it, you’ll have to set it up manually — this can seem like a complicated process but I’ve tested it with my own iPhone and it’s easy.
- Install the OpenVPN Connect App onto your iPhone or iPad from the App Store.
- On your browser, visit the IPVanish website and create an account.
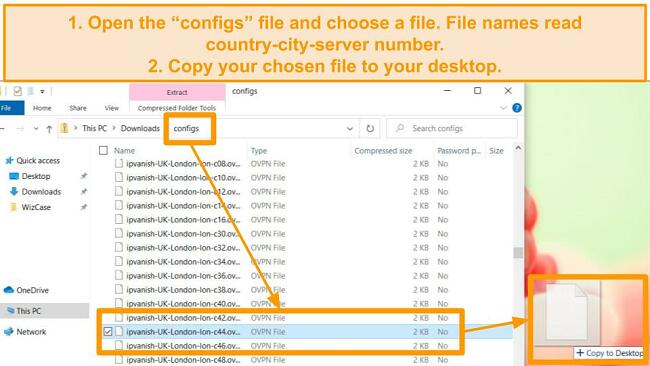
- Download the IPVanish OpenVPN (.OVPN) configuration files from this link — https://www.ipvanish.com/software/simpleconf/configs.zip
- Unzip the files and find the file you want to use. In this example, I’m using ipvanish-UK-London-lon-c44.ovpn.
- Copy it to your desktop.
- Send the file to yourself by attaching it to an email address you can check on your iOS device.
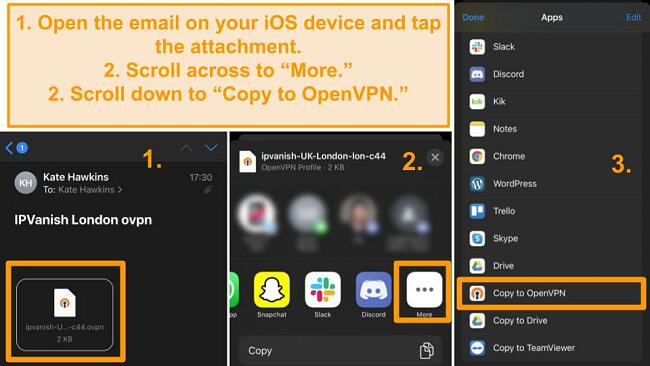
- Open the email and tap the attachment.
- Click “More” and scroll down to “Copy to OpenVPN”. OpenVPN will automatically open.
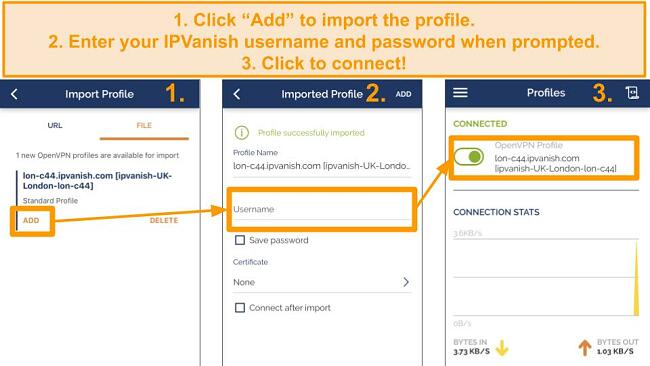
- Click “Add” to import the profile.
- Enter your IPVanish username and password when prompted.
- Click to connect.
- Your internet connection is now secured by the OpenVPN protocol!
Get IPVanish for iPhone or iPad!
How to Set Up OpenVPN on iPhone and iPad (Any VPN)
- Open the App Store and install the OpenVPN Connect App.
- Visit the website of your VPN provider.
- Download their OpenVPN (.OVPN) configuration files — it will be a .zip file.
- Unzip the files and send them to yourself by email or drop them into the OpenVPN app using iTunes sync.
- Download the files to your iOS device.
- Open the OpenVPN Connect app.
- Click “Import” and choose the configuration files you downloaded.
- Select a server and log in.
- Your internet connection is now secured by the OpenVPN protocol!
Don’t Leave Your iPhone or iPad Exposed to Online Spying and Cyberthreats
As an iPhone or iPad owner, chances are it’s with you most of the day and you’re constantly using it for information, communication, entertainment or commerce. To keep your data and personal information safe when using your device on a public network, make sure to use VPN services. That one extra level of protection could be the difference giving you the privacy and protection you need.
Secure your iOS device with ExpressVPN